- March 27, 2023
- Posted by: Muhammad Shoaib Afzal
- Category: VIII. Financial Management

FINANCIAL MANAGEMENT
If you are an accountant or bookkeeper, you know that financial management is a critical part of running a successful business. Financial management is the process of decision-making in order to achieve the desired goal of the company. It is important to have a good understanding of financial statements and how to use them in order to make sound decisions. While many businesses still use paper-based financial management systems, there is a growing trend toward using accounting software to manage finances. Our system offers a financial management module. This module can be very beneficial to your business as it can help you keep track of your financial payments, receipts, journal vouchers, import statement, budget projections, and upload backups. Having a good understanding of your finances is critical to the success of your business. A financial management module can help you achieve this goal efficiently.

This module allows you to manage the finances of your business efficiently, yet with ease.
1) PAYMENTS:
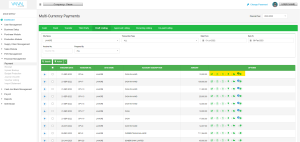
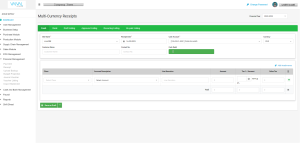
This screen can be used to create vouchers for making payments including multi-currency payments that are due to you. VaivalERP provides you the flexibility to make the payment either by cash or perform a bank transfer to your vendors’ accounts or pay off your utility bills.
A- Cash
If you want to make a payment by cash, you can use the tab of Cash on the Payments screen that can be accessed by this path.
Main Menu > Financial Management > Payments
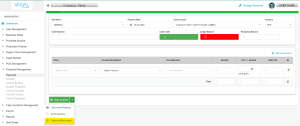
From the Cash Account selection menu, select the account from which you want to make the payment. Only the accounts that are already linked to the system will appear in this list. As soon as you make the selection, the current balance of the account will be reflected under Ledger Balance.
To proceed further, select the account of the payee from the Account Description selection menu.
Enter the payment amount that you owe to the payee under Amount. If there is any withholding tax, then apply it from the Tax% menu. The Tax Amount will be calculated accordingly and will appear on the screen. Cash Credit will be updated accordingly. The remaining Balance reflects the updated amount in your account which will be left after the payment that you are processing.
The voucher is first saved as a draft which can be seen on the Draft Listing tab.
Note: Before saving the draft, always select the financial year in which you are making the payment, so the payment records are rightly maintained and easy to fetch when required. For example, at the time of the audit.
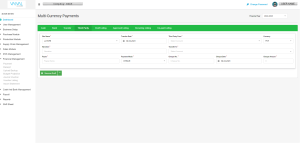
B- Bank
This mode of payment is mostly used to make advance payments.
Similar to creating the Cash payment voucher, this tab on the Payments screen allows you to create a voucher for making a payment through the bank. This voucher will also be first saved as a draft upon clicking the button Save as Draft. You can find the saved draft on the Draft Listing by selecting the (BPV) Bank Payment Voucher from the Transaction Type selection list.
Figure: Financial Management > Payments > Bank
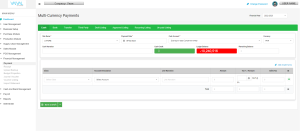
C- Transfer
Along with Cash & Bank payment, you can also transfer the payment to different accounts of your own or your vendors or anyone through this screen.
Figure: Financial Management > Payments > Transfer
![]()
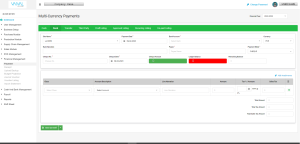
D- Third Party
You can also transfer the payment from different vendors to other vendors directly through this screen.
Figure: Financial Management > Payments > Third Party
E- Draft Listing
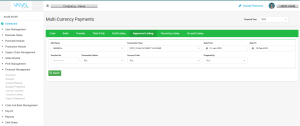
This screen allows you to view, edit, print, approve/cancel, or delete your drafted payment vouchers of both types – Cash payment and bank payment. Using the filters (Site Name, Transaction Type, Date From/To, Prepared by) you can fetch the saved payment vouchers in the system. Also, you can choose to view the drafts of a whole financial year from the Financial Year filter. A draft that is canceled is deleted from the system. Approved drafts appear in the Approved Listing as record.
Figure: Financial Management > Payments > Draft Listing

In the draft listing, you are given many options to attach related documents with the transaction such as editing the added payment you can also copy the same transaction and edit that a bit when data is sequential.
Figure: Financial Management > Payments > Draft Listing options
Edit Voucher: Upon clicking edit voucher the same voucher will open up for editing.
Figure: Financial Management > Payments > Draft Listing Edit Option
![]()
Export to Voucher: Upon clicking on this option the relevant voucher will be opened in a printing format from where you can down the voucher or print it. In the case of cash payment transactions a cash payment voucher will open up and in the case of bank payment transactions a bank payment voucher will open up.
Figure: Financial Management > Payments > Draft Listing Export to Voucher Option
![]()
Figure: Financial Management > Payments > Draft Listing Export to Voucher Option Window

Export to Acknowledge slip: Upon clicking on this icon an acknowledgment slip will open up and you can download and print it.
Figure: Financial Management > Payments > Draft Listing Export to Acknowledgement Slip Option

Voucher Posting: Upon clicking this option an add note window will pop up you can enter any related information here.
Figure: Financial Management > Payments > Draft Listing Voucher Posting Option

Attachment: Upon clicking Attachment a pop-up window will appear which will ask you to choose a file that you would like to add as evidence of the selected transaction. This option is a second option if you forget to attach a file while adding the transaction. You don’t have to edit the whole transaction, you just need to attach that file from here.
Figure: Financial Management > Payments > Draft Listing Attachment Option

Copy: Upon clicking copy, the same invoice would be copied and it will help you when you have sequential data to enter.
Figure: Financial Management > Payments > Draft Listing Copy Option
![]()
F- Approve Listing:
All the data after approval goes in the approved listing and only this data is going to reflect in Financial Statements and Cheque Status screen.
Figure: Financial Management > Payments > Approve Listing Option
G- Recurring Listing:
This feature is added to assist you with repeated and sequential data entry. You can add a recurring payment, when you add a regular payment in the Vaival ERP payment screen you can click on the dropdown by the side of “Save as Draft” and from that dropdown select “Save as Recursion”.
Figure: Financial Management > Payments > Cash
After adding a voucher from here you can find these in the Recurring Listing screen.
Figure: Financial Management > Payments > Recurring Listing
H- Unpaid Listing
This tab can be used to make the payment on the outstanding invoices that already exist in the system. Here are the steps that need to be followed in the order:
1- Find the outstanding payment invoice using the filters (Site Name, Transaction Type, Date From/To, Vendor Name). Outstanding Total reflects the total amount that you owe to the selected vendor.
2- Select the payment invoice against which you want to make the payment.
3- Enter the amount that you want to pay in the Cash/Bank Payment field. It will cause the Adjusted and the Payment fields against the selected invoice to auto-populate.
4- Select the payment mode (Cash/Bank).
Figure: Financial Management > Payments > Unpaid Listing

5- Different windows will appear upon the selection of Cash Payment mode and Bank Payment mode.
Figure: Financial Management > Payments > Unpaid Listing > Cash Payment
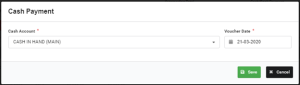
Figure: Financial Management > Payments > Unpaid Listing > Bank Payment

6- Once you enter the valid details, and click the Save button, you will get a success notification on your screen. However, if the payment amount is greater than the total balance of the selected Cash/Bank account, the system will give you an error message.
Figure: Payment success notification

7- Alternatively, you choose to pay off the vendor’s total outstanding amount at once by selecting Using Prepayment option.
On this window, you can either choose a single invoice or multiple invoices to clear the payment. Using this method will auto-populate the field of Cash/Bank Payment.
Figure: Financial Management > Payments > Unpaid Listing > Prepayment Listing 1

Clicking the Process Knock Off button will clear the invoice, and the system will display a notification message upon successful payment processing.
Figure: Financial Management > Payments > Unpaid Listing > Prepayment Listing 2

2) RECEIPTS:
This module can be used to receive payments from the customers/client against the goods/services that you have sold/provided. Similar to the Payment module, you can create Cash/Bank payment vouchers which can be approved/edited/canceled on the Draft Listing tab of the screen.
Recurring listing is also present like payment recurring you can also add recurring receiving.
Unpaid Listing is used to receiving payments against already existing sales invoices.
Prepayment Listing on the Unpaid Listing screen can be used to receive all the receivable amounts on a single or multiple invoice(s) from a customer at once.
This screen can be accessed by the path
Main Menu > Financial Management > Receipts
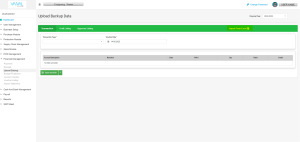
3) UPLOAD BACKUP DATA:
This screen gives you the right to upload data in bulk and you can also add it transaction by transaction same as payments & receipts you have the draft listing and approve listing where you can see transactions in draft and transactions that are approved.
To add data in bulk you need to click on “Import from Excel” on the top right of your screen.
Main Menu > Financial Management > Upload Backup Data
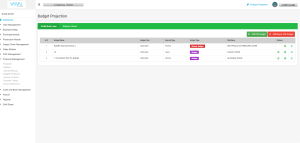
4) BUDGET PROJECTION:
Main Menu > Financial Management > Budget Projection
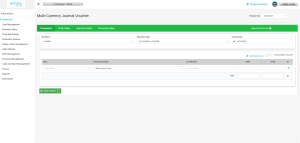
5) JOURNAL VOUCHER:
This screen can be used to create journal vouchers. You can select the accounts that you want to debit and credit from the COA list that appears in the selection menu of Account Description.
Note: The system will generate an error if debit and credit amounts are not equal.
Figure: Financial Management > Journal Voucher
Alternatively, you can also import multiple voucher information by using the Import from Excel option. To use this option, you have to use the predefined excel sheet format that can be downloaded from the Import from Excel pop-up window.
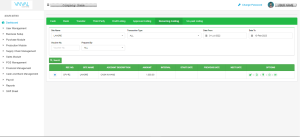
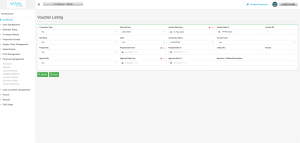
6) VOUCHER LISTING:
A voucher listing is a screen where you can find any transaction anywhere in the system of any type. Here all the data is saved you can find it with the help of different filters; date, narration, voucher no. etc.
This helps you to find any missing data as you don’t have to walk around in other modules one by one and go through the draft listing or approve listing to find one transaction.
Figure: Financial Management > Voucher Listing
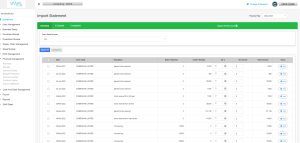
7) IMPORT STATEMENT:
The import statement screen allows you to import your bank statements in excel format for reconciliation. You don’t have to go cheque by cheque, here all the cheques would be automatically matched and bank reconciliation will take place. The system will also notify you of the pending or unmatched cheques so you can recheck and add what is missing.
Figure: Financial Management > Import Statement