- March 27, 2023
- Posted by: Muhammad Shoaib Afzal
- Category: I. User Management
USER MANAGEMENT
User management in an ERP (Enterprise Resource Planning) system refers to the process of creating, maintaining, and controlling user accounts that access and use the system. It involves defining user roles and permissions, setting up authentication and authorization protocols, and managing user profiles, including personal information, access rights, and preferences.
User management is critical to ensure data security, maintain data integrity, and prevent unauthorized access to sensitive information. It enables administrators to control user access based on their job functions, limit access to specific modules, and restrict actions that may cause data loss or corruption.
User management also allows organizations to manage user accounts efficiently by automating user account creation and deactivation, enforcing password policies, and monitoring user activity logs for suspicious behavior.
Overall, effective user management is an essential component of any ERP system, ensuring that users have access to the data they need to do their jobs while protecting the organization’s data assets from unauthorized access or misuse.
The first and foremost module is USER MANAGEMENT. This is an extremely important and influential module because this allocates who sees what, meaning assigning operational capacity to users. It includes roles and rights for every user, meaning assigning other modules, and screens and giving the user access to other parts of the system. As you click on the User Management Module it drop-down into 7 other parts giving you options to manage your user’s profile, rights, sites, vouchers, special roles, roles, and role rights. This activity is performed when you are setting up the system for the first time, in actuality, you tell the system how many users you have and who and up to what extent they are allowed to operate in the system. And this activity is re-performed when you add a new user or you change any existing user’s operational capacity.
As you can see in the above picture
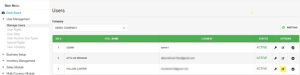
MANAGE USER:
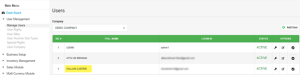
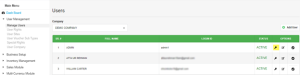
You have to select Manage Users under User Management to view all the users of the system along with their Full Name, Login ID, and Status. This screen also allows you to add/block a user or edit an existing user’s information or change the user’s account password.

a) Add User
Follow the mentioned below steps to add new users to the system.
- Click the Add User button on the Manage Users screen.
A window will pop up. Provide the required information for setting a new user profile. You can assign a SITE to the new user profile that the user will be able to access via his account. If a site is not assigned at the time of adding a new user, you can always assign a SITE to the user later by editing the user’s information.
Figure: Manage Users > Add User

- Clicking the Save button and the user will be added to the system. The new user’s record will appear among already existing users on the Manage Users screen.
Figure: Manage Users > Add User > New User Record
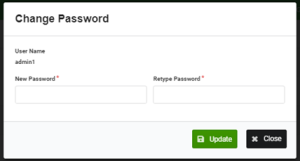
b) Change the User’s Password
To change a user’s account password, click on the key icon.
Figure: Manage Users > Change Password
A Change Password window will pop up, enter the new password, and click the Update button.
Figure: Manage Users > Change Password
You will get a notification on the top-right corner of your screen that confirms the password change action.
Figure: Manage Users > Change Password > Success Notification
![]()
c) Edit User
To edit an existing user’s information, click on the edit icon.
Figure: Manage Users > Edit User
By clicking on Edit User a window will pop up and you can make the changes to the user’s First Name/Last Name, Email ID, Back Office Manager selection, and assigned SITES. However, you cannot edit a user’s Login ID. Clicking the Save button will update the user’s information.
Figure: Manage Users > Edit User

d) Block/Unblock User
1- Block User
If you want to delete a user from the VaivalERP system, you have the option to block the user which works exactly as if the user has been deleted. It revokes the access of the user to the system. i.e., the user will no longer be able to log in to the system. However, the user’s account profile information will remain saved in the system. A blocked user’s STATUS will appear as BLOCKED on the Manage Users screen.
To block a user, click on the rightmost icon.
Figure: Manage Users > Delete User

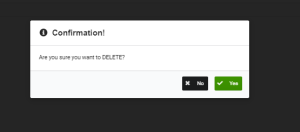
A confirmation message will appear. Click on the Yes button to block the user.
Figure: Manage Users > Delete User > Confirmation

You will get a success notification on the top-right of your screen. It will confirm that the user’s access to the system has been blocked.
Figure: Manage Users > Delete User > Success Notification
![]()
The user’s status will now appear as BLOCKED in the system.
Figure: Manage Users > Deleted User’s Status

2- Unblock User
To activate a blocked user in the system, click on the right-most option under OPTIONS against the blocked user on the Manage Users screen.
Figure: Manage Users > Unblock User

You will get a success notification on the top-right of your screen. It will confirm that the user’s access to the system has been resumed. The user’s STATUS will also be changed to ACTIVE.
Figure: Manage Users > Unblock User > Success Notification
![]()
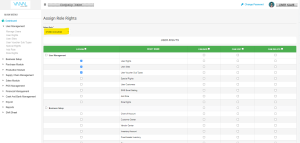
2) USER RIGHTS
VaivalERP enables you to define users’ access level by assigning user rights for every module to every user, individually, following are the module present on the screen along with 5 checkboxes, the left checkboxes are for assigning the modules and their related screens and the right checkboxes are for adding, editing or deleting rights in each module and each screen of a certain module. Below is the list of modules.
1- User Management
2- Business Setup
3- Purchase module
4- Production module
5- Supply Chain Management
6- Sales Module
7- POS Management
8- Financial Management
9- Cash and Bank Management
10- Payroll
11- Reports
12- General Reports
13- Receivable and Payables
14- Management Reports
15- POS Reports
Further, restrictions for record modification can also be applied to the users.
To define these, first select the user from the drop-down menu, as you click the select user field it will show all the added user IDs that you entered previously, assign, and select one user at a time.
Figure: User Management > User Rights
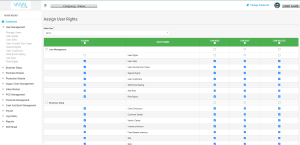
ASSIGN: Use checkboxes under ASSIGN to allow the user to view/access a certain module. Use the checkbox under “ASSIGN” for assigning all screens of all the modules to the user.
EXTREME LEFT CHECKBOX: This checkbox is placed behind each module by clicking this you can assign all the screens in a certain module to a specific user.
CAN ADD: This selection determines that the user can Add new data into the system against the assigned screen of a certain module.
CAN EDIT: This selection determines that the user can Edit the added data into the system against the assigned screen of a certain module.
CAN DELETE: This selection determines that the user can Delete the added data into the system against the assigned screen of a certain module.
Note:
- You can assign access to all the modules and rights at once by using the ASSIGN checkbox.
- Click the Save button at the end of the page to save the changes.
The right combination of these User Access Rules and Editing Permissions enables you to set up a controlled environment in the system i.e. avoiding unauthorized users to access critical information or making unwanted edits.
3) USER SITES
This feature is used to assign different “SITES” to the system users. SITES refers to your business’s operational units in different areas.
Select the user from the Select User dropdown selection menu to whom you want to give access to certain SITE information. Click the Save button to update the changes in the system.
Figure: User Management > Sites

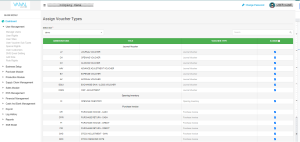
4) USER VOUCHER SUBTYPE
Vouchers are significant for business record keeping. But it is also important to manage who can add and access what type of records within the system. In VaivalERP, you can achieve a high level of information security by limiting the access of users to voucher types. Only authorized users of the concerned department can have access to the relevant vouchers. Voucher assignment can be implemented by opening the Assign Voucher Types screen from the path Main Menu > User Management > User Voucher Sub Types.
From here you can select a User from the Select User drop-down menu and can assign voucher types to different users added to the system. Click the Save button to update the changes in the system.
Figure: User Management > User Voucher SubTypes
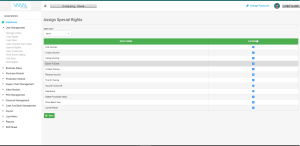
5) SPECIAL RIGHTS
You can use this screen to assign special rights to the users, for example, the right to use the feature of exporting the information to an Excel sheet.
From here you can select a User from the Select User drop-down menu and can assign Special Rights to different users added to the system. Click the Save button to update the changes in the system.
Menu > User Management > Special Rights.
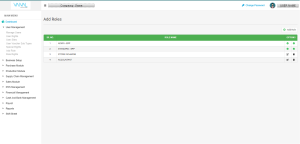
6) ADD ROLES
This screen allows you to add different roles in your system which means that you can define roles as per your need and can segregate and allocate people’s work according to their job roles in your company. There is no restriction on how many roles you can add to this screen but a better approach would be to add a reasonable number of roles so it’s easier for you to manage them.
Menu > User Management > Add Roles.
- Add Role
This is the screen of Add Roles as you click on the Add role another window will pop up. Here you have to give a title for the Role you want to add and some description of that role.
Menu > User Management > Add Roles
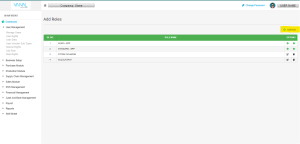
Menu > User Management > Add Roles
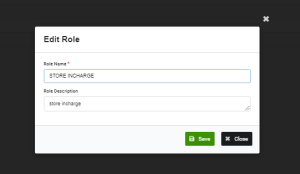
- Edit Role
You can always edit the added role from here. As you click on the edit option a window will pop up and here you can make the edits.
Menu > User Management > Add Roles > Edit Roles

Roles > Edit Roles
- Delete Role:
You can also delete an added role as you click on this icon a window will appear you can give it the confirmation of deleting a specific role.
Menu > User Management > Add Roles > Delete Roles

Menu > User Management > Add Roles > Delete Roles
7) ROLE RIGHTS
As you land on this screen it will ask you to select from the roles you added in the above “ADD ROLE” screen. And after selecting a specific role it gives you check boxes on the left side of the screen to give access to the mentioned modules and screens to this selected role which means, whoever is assigned to this role will have access to the modules and screen that is given to this role from here.
Menu > User Management > Roles Rights > Select Role
After clicking the check-boxes of the modules and screen that you want to assign to this role, you have to click “Save” to save these role rights in the system. As these changes are saved in the system, the system will automatically pop up a “Rights assigned successfully” message on the top right of the screen. Meaning the system has saved these changes.
Menu > User Management > Roles Rights > Save Role Rights